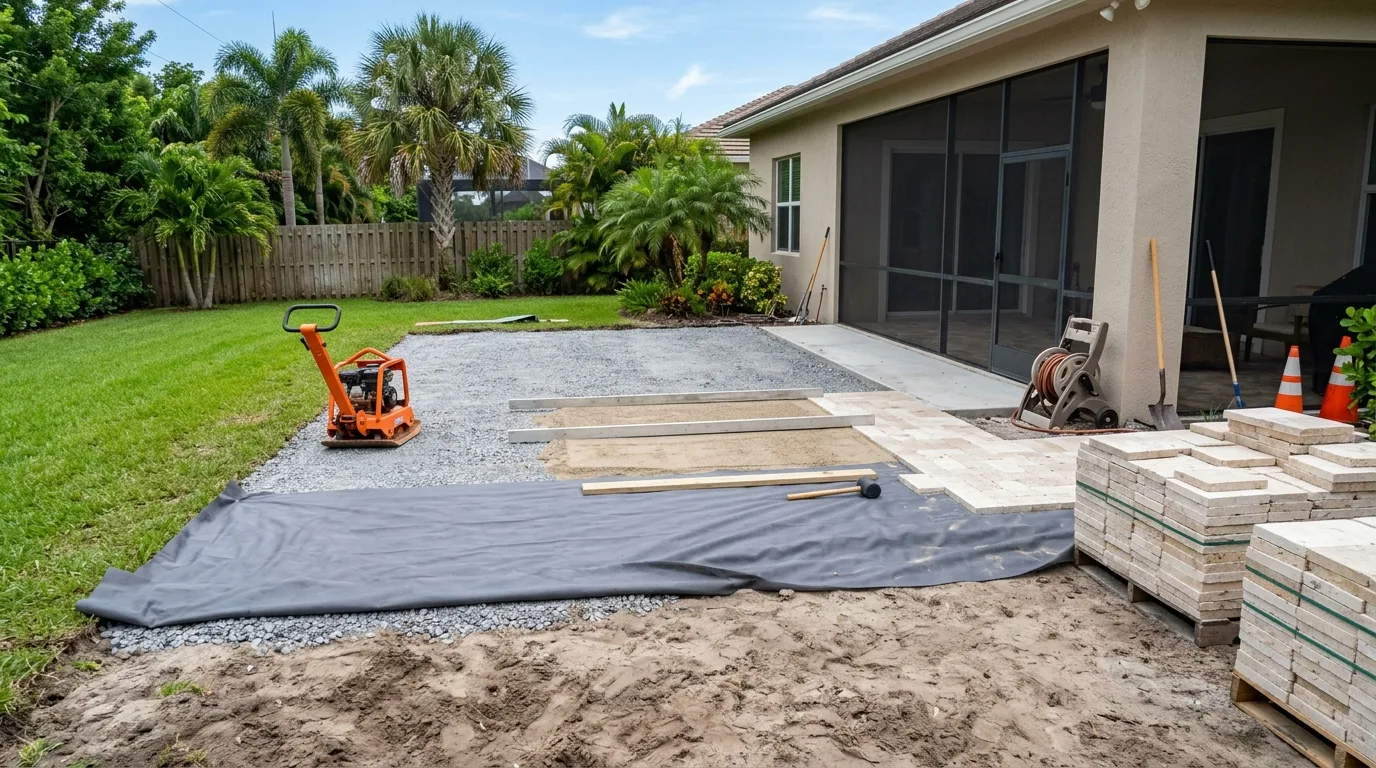
Short answer: no, you can’t install pavers over grass or dirt directly and expect them to last. They’ll be tilting within one Florida rainy season. We’re licensed paver contractors (CILB #U-22487) in Boca Raton, and a real slice of our repair work across Palm Beach and Broward County is pulling up “installations” that skipped the base — laid straight on the lawn, straight on the dirt, straight on whatever was there. The pavers themselves are almost always fine. It’s what’s under them that failed, because nothing was under them.
So here’s the honest version: why attempts to install pavers over grass or dirt directly fail so consistently, the right way to build a paver surface where grass currently is, what’s realistically DIY, and what a proper install actually costs versus the “cheat” version.
Why Laying Pavers Straight on Grass or Dirt Fails Within a Season
The pavers are engineered for loads far greater than foot traffic — they’re rated for vehicles. The failure mode has nothing to do with the paver’s strength. It has to do with what’s under it.
Grass decomposes into voids. Even if you lay a paver on freshly mowed, level turf, the grass under it dies within days (no sunlight), and the organic root mat starts breaking down. Decomposition is volume loss. Where there was a mat of living tissue, there’s now a soft pocket. The paver drops into that pocket unevenly, because organic material doesn’t decompose uniformly. Multiply by every paver in the field and you get the tell-tale patchwork tilt within a couple of months.
Roots keep growing sideways. Turfgrass roots don’t stop when you cover them; they redirect. Bermuda, St. Augustine, Zoysia — all of them will send runners along the underside of a paver looking for light and water at the joints. Those runners lift pavers unevenly and reappear in every joint you didn’t fill correctly.
Dirt has no load-bearing preparation. Native Florida soil ranges from sugar sand to muck depending on the neighborhood. None of it is compacted to any spec. Set a paver on it, put weight on the paver, and the soil compresses non-uniformly under the load — always more at the edges where the load concentrates. The paver rocks. Once one edge is a quarter-inch lower than the other, water runs to that edge, softens the soil further, and the tilt accelerates.
Water carries the sand through the joints. With no base and no edge restraint, joint sand has nowhere to lock against. Every rain flushes some of it downward through the paver field and out the edges. Once the joints open, pavers stop transferring load between each other, and each one starts failing individually.
There’s no compaction and no edge restraint. These are the two invisible parts of a real installation, and they’re exactly what a laid-on-grass job skips. Without base compaction, the ground under the pavers is looser than the ground beside them. Without edge restraint, the pavers at the perimeter slide outward under any lateral load, opening the whole field.
None of this is theoretical. Every one of these failures shows up on the driveways and patios we’re called to repair, and the underlying cause is almost always the same: no base.
The Right Way to Install Pavers Over Grass or Dirt
If you want to install pavers over grass or dirt and have them last, this is the sequence. Whether you DIY or hire it out, the seven steps below are the same — this is essentially our paver installation protocol for a patio, adapted so a homeowner can read it end to end.
Step 1 — Kill and physically remove the grass. Chemical kill alone (glyphosate, etc.) doesn’t help you here — the dead root mat is still organic material that will decompose under the paver. Use a rented sod cutter for anything over 100 sq ft, or hand-dig with a flat shovel for smaller areas. Get down past the root zone into mineral soil, typically 2–3 inches below original turf level. Bag it up and haul it. Don’t till it in — you’re trying to remove organics, not blend them.
Step 2 — Excavate to depth. For a patio or walkway, dig 7–10 inches below your finished paver height. For a driveway, 12–14 inches. Slope the excavated subgrade away from any structure at a minimum 1/8 inch per foot, ideally 1/4 inch — Florida rain volume is the real design constraint, and the base slope has to be established here, before any material goes in. If you’re within 10 feet of a house, slope away from the foundation, not toward it.
Step 3 — Lay geotextile separation fabric. This is the step “cheap” installs skip and the step that most quietly determines longevity. A woven geotextile between native soil and crushed-stone base does two jobs: it blocks new roots from growing up into your base, and it stops the crushed stone from migrating down into the soil below (which would create voids in your base years later). Overlap seams by 12 inches. It costs pennies per square foot and doubles the useful life of the installation.
Step 4 — Crushed limestone base in 2-inch compacted lifts. This is the structural layer. Use ¾-inch minus crushed limestone (in South Florida the common spec) — not pea gravel, not “paver base sand,” not concrete leftovers. Spread 2 inches, mist with water, run a plate compactor over it in overlapping passes until it stops changing under the plate. Then add the next 2 inches and repeat. Compacting in a single 6-inch lift does not compact — it just presses the top down and leaves the bottom soft. Total: 4–6 inches for a patio, 8–10 for a driveway.
Step 5 — Install edge restraint. Rigid PVC or aluminum edging spiked into the compacted base, running the entire perimeter. This is what prevents lateral movement of the paver field for its entire life. Skipping it is why so many DIY jobs open up along the edges within a year. Concrete curb, spiked plastic edging, and aluminum edging all work; loose gravel or “the lawn will hold it” do not.
Step 6 — Bedding sand: exactly 1 inch, screeded. Concrete sand or ASTM C33 sand, screeded to a uniform 1 inch. Do not compact the bedding sand — it has to stay loose so the pavers seat into it. Screed it with a 2x4 pulled across two 1-inch pipes used as depth guides. Any thicker than 1 inch and the pavers will settle unevenly; any thinner and they won’t seat.
Step 7 — Lay pavers, tap in, sweep and lock joints. Set pavers hand-tight against each other in your chosen pattern, working from a straight edge outward. Cut edge pieces with a wet saw. Tap each paver with a rubber mallet or run a plate compactor with a protective mat once the whole field is down. Sweep in polymeric sand, activate per the product’s instructions, and you have a real installation.
That’s it. There’s no shortcut through any of those seven steps that doesn’t move you to a completely different — and much shorter — life expectancy.
The Only “Direct-on-Grass” Install That Sort of Works: Stepping Stones
We’ll be straight about the one case where laying stones without a real base is defensible: scattered stepping stones through a garden bed or across a lawn, where each stone is independent, no one is standing on multiple stones at once, and slight annual settling doesn’t matter.
The method: cut the turf outline around each stone with a spade, remove 2–3 inches of sod and soil, drop in an inch of bedding sand, set the stone flush with grade so a mower can pass over it. Accept that you’ll re-level them every year or two.
This is landscaping, not paver installation. It fails as soon as you connect the stones into a walkway or patio, because connected pavers behave as a system — when one moves, it stresses its neighbors, and the whole field starts failing together. If you find yourself wanting more than four or five stones in a row, you’ve crossed from stepping stones into a walkway, and a walkway needs the base.
What’s Realistically DIY — and Where Most Weekend Projects Break
We’ll say this plainly, because we’d rather you do a smaller project well than a bigger one badly.
Realistic DIY scope:
- Under 200 sq ft
- Patio or walkway, not driveway (driveways carry vehicle loads and take specialized compaction)
- No drainage complications — no slope toward the house, no low spot the yard drains into, no near-pool situation with pool-deck codes
- No permits or HOA architectural review required
- You can rent a plate compactor for a weekend and use it correctly
- You have a helper — a paver install is not a solo project
At that scope, a careful DIYer with the right rentals can produce a durable patio. Budget the full weekend, don’t skip the geotextile, and don’t try to substitute “paver base sand” for actual crushed limestone. It’s the single most common failure we see.
Call a pro when:
- It’s a driveway. Driveways demand deeper base, denser compaction, and proper transitions to the street. A failed DIY driveway costs more to remove and redo than the pro install would have cost the first time.
- It’s over 200 sq ft. The physical labor of hand-excavating and hauling that much material, then getting slope correct across a large area, exceeds most weekend-warrior budgets.
- Drainage is complicated. Anything near a pool, a foundation, or a low spot in the yard needs slope design that isn’t intuitive. Water goes where you tell it or where physics tells it — one of those is more predictable.
- You have HOA or permit requirements. Especially common in gated Palm Beach and Broward communities. A pro will pull permits and handle the review; a DIYer often finds out about it only after the neighbor complains.
- You want it to look right when it’s done. Cutting curves, matching pattern lines across a 300 sq ft field, running an even joint width, and finishing edges cleanly are skills that take years. The material cost is similar; the labor and know-how are the difference.
Our full paver installation service across Palm Beach and Broward runs $12–$32/sq ft installed, depending on paver choice, pattern complexity, and site prep. That’s inclusive of excavation, geotextile, compacted base, edge restraint, bedding sand, pavers, and polymeric jointing — the whole seven-step protocol above, done once, warranted.
The Three Mistakes That Sink Most “I Almost Did It Right” Installs
Even the DIYers who read the guides tend to skip or undersize the same three things.
1. Skipping the geotextile fabric. It costs almost nothing and it’s the single biggest longevity multiplier. Roots come back. Base migrates down into soil. Both happen invisibly for the first year, then show up as scattered soft spots that get worse. A $40 roll of woven geotextile prevents both.
2. Compacting the base in one big lift instead of 2-inch lifts. Plate compactors are surface-effect tools — they compact what’s directly under the plate, not what’s 6 inches below it. A single 6-inch dump-and-compact looks compacted on top and stays loose underneath. Two months later, that loose underlayer consolidates under load and the pavers drop. The fix is discipline: 2 inches of stone, water, compact, next 2 inches, water, compact. Every time.
3. Bedding sand too thick. “More sand, easier to level” is intuitive and wrong. Any bedding thicker than 1 inch consolidates unpredictably under weight; some spots compress more than others, and the pavers ripple. The whole point of the 1-inch spec is that it’s thin enough not to consolidate meaningfully. Screed exactly 1 inch off compacted base, and leave it loose.
There’s a fourth honorable mention — using play sand or “paver base sand” for the base layer instead of crushed limestone. Neither has the angular grain structure that locks together under compaction. Both stay soft. If the bag doesn’t say crushed limestone or ¾-inch minus aggregate, it’s not base material.
Cost Comparison: Doing It Right vs. the “Cheat” Install
Here’s the honest numbers side-by-side for a 200 sq ft patio.
| Approach | Materials | Labor | Life expectancy | Total cost of ownership |
|---|---|---|---|---|
| Pavers straight on grass/dirt | ~$500 (pavers, bag of sand) | DIY weekend | 1 season | $500 now + $2,400–$6,400 to pull up and redo properly next year |
| DIY done right | ~$800 (pavers, base, geotextile, edging, poly sand) + $200 rentals (plate compactor, sod cutter) | Full weekend, two people | 15–20 years with maintenance | ~$1,000 |
| Professional install | Included in per-sq-ft rate | Included | 25+ years with maintenance, warranted | $2,400–$6,400 ($12–$32/sq ft) |
The “cheat” install is the most expensive of the three when you count the redo. Every summer we get calls from homeowners whose DIY-on-grass patio has become the removal-and-rebuild we’re now quoting — the pavers themselves are almost always salvageable, but the labor of pulling them up, hauling them, then doing the full base install underneath adds meaningfully to what the job would have cost if done right the first time.
There’s a version of this project we recommend without reservation: DIY a small patio, correctly, over one weekend. Rent the plate compactor, buy the geotextile, do the base in 2-inch lifts, use real bedding sand at 1 inch. It’s genuinely achievable at 100–200 sq ft, and it’s satisfying work.
The version we’d steer you away from is any install where the answer to “what’s the base?” is “the lawn.” That’s not an installation. That’s a decoration with a one-season warranty, and we’ve been the ones called to remove it. If you’d like an honest read on whether your project is DIY-able or better hired out, we do free on-site assessments across Boca Raton, Delray Beach, Boynton Beach, Deerfield Beach, Fort Lauderdale, and Pompano Beach — and we’ll tell you straight when it’s a weekend job.