What the Paver Installation Process Looks Like for Homeowners
Author: Ciprian Stancioi - CEO Craft Pavers
Date: August 3rd, 2025
Table Of Contents
You want a nice area with pavers, but paver installation process can seem hard. Many homeowners face big challenges, like understanding local rules, moving heavy materials, and making mistakes that lead to uneven surfaces or extra costs.
Figuring out building rules for Paver Installation can be tricky.
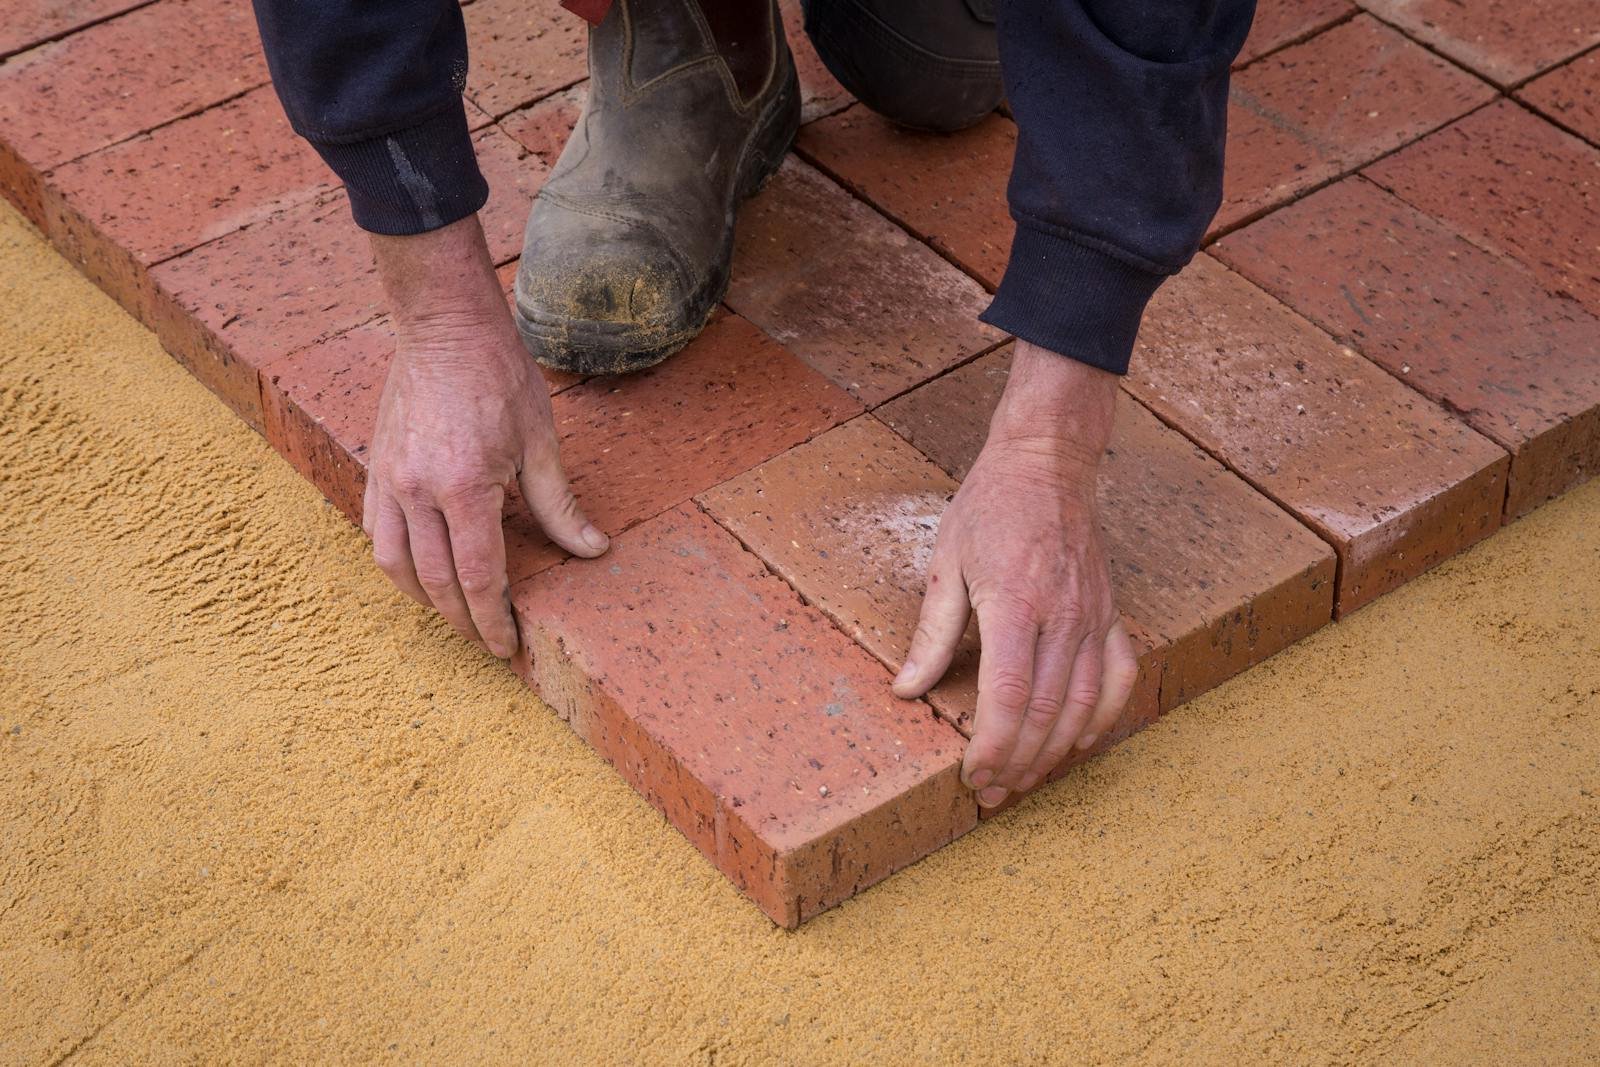
Lifting and placing pavers requires skill and care.
Mistakes in DIY Paver Installation often cause poor base work and water drainage issues.
Creating a plan and budget helps you avoid these problems.
Choosing the right team for your Paver Installation makes a big difference. Craft Pavers offers peace of mind with expert guidance, skilled workers, and the best pavers. You get an easy, professional job and a result you’ll love.
Key Takeaways
Plan your paver installation process with care. Check your yard first. Pick the right materials. Learn about local rules. This helps you avoid expensive mistakes.
Pick strong pavers that can handle bad weather. Choose designs that match your outdoor space. This will help your project last long and look nice.
Follow each step of installation. Start with excavation and base preparation. Then lay the pavers. Add edge restraints at the end. This makes your patio, driveway, or walkway stable and pretty.
Keep your pavers looking good with regular cleaning as a easy maintenance. Seal them and check for problems often. This helps you fix issues early and protects your money.
Think about hiring professionals like Craft Pavers. They can save you time and give expert advice. This helps your paver installation last longer and adds value to your home.
Your Paver Installation Process Planning
You can change your outdoor space with good planning. Every great paver installation starts with careful steps. These steps help make your patio strong and nice to look at. Planning gives you confidence and helps you avoid expensive mistakes. Let’s look at the steps so you can get your patio ready and have an easy time.
Site Evaluation
Start by surveying the site to understand its overall layout, slope, and any potential obstacles. Take note of natural features, existing structures, and areas prone to water accumulation. Photographs can help document initial conditions and visualize changes needed. Here are some tips to help you:
Check what kind of soil you have and if it is wet. Strong soil helps your paver installation last. Good soil should be firm and resist deformation when compacted.
Look at how water moves. A small slope stops water from sitting and keeps your pavers safe. Dig a small hole about 12 inches deep and fill it with water. If the water takes more than 24 hours to drain, soil amendments or drainage solutions might be necessary.
Take out soft dirt and trash so your patio has a good base.
Think about how you will get to the area. Hard-to-reach spots may need special tools or more workers.
Use soil testing kits for pH and nutrients.
Use laser levels for accurate slope measurement.
Drainage spades for excavation in high-risk areas.
Good planning now keeps your paver stones flat and safe for a long time.
Design & Material Selection
Think about your dream design. Pick patterns and styles that fit your outdoor space. Choose strong materials that work for your weather. Here are some popular choices:
Material
Key Benefits
Considerations
Concrete
Strong, can be used many ways, salt-resistant
Needs sealing
Porcelain
Easy to care for, salt-resistant
Needs a pro to install
Travertine
Feels cool, looks fancy
Costs more
Natural Stone
Handles heat, always looks good
Needs sealing
Brick
Classic look, strong
Might chip later
Clay
Keeps color, always looks good
Not many shapes
Good materials help your paver installation last and look great.
Permits & Timeline
Planning means checking the rules before you start. Most cities in Florida want you to get permits for paver installation. You might need to show plans, drawings, and have inspections. The cost and time depend on where you live and how big your project is. It usually takes 3 to 14 days to finish, depending on the size and how hard it is. Professionals work faster and help you avoid waiting.
Tip: Start planning early. Get your papers ready and ask your installer for help with permits.
These steps help you have a great paver installation. Careful planning makes your home look better for a long time.
Types of Paver Installations
You have many options when you want to upgrade your outdoor space. The main types of paver installations include driveways, walkways, and patios. Each type brings its own benefits and style. You can choose the best fit for your home and lifestyle.
Driveways
Driveway pavers give your home a strong and beautiful entrance. You can pick from concrete, brick, natural stone, or porcelain. Each type has its own look and level of strength. Driveway pavers must handle heavy cars and lots of use. You want a base that stays firm and drains water well. Concrete pavers cost less at first and last a long time. Brick pavers look classic and stay strong, but they may chip over time. Natural stone gives a high-end look and can last for years. Porcelain pavers offer a modern style and resist stains. Resin-bound pavers also work well for driveways, giving you a smooth, durable surface that lasts up to 20 years with easy repairs.
Tip: A well-installed driveway boosts your home’s value and curb appeal.
Walkways guide you and your guests through your yard. You want walkway pavers that stay flat and safe in all weather. These pavers need a strong, level base to stop shifting or sagging. You can pick patterns like herringbone or running bond for a stylish path. Choose materials that match your home and handle foot traffic. Walkways often use concrete, brick, or natural stone. Porcelain walkway pavers work well for a modern look. Rubber pavers offer an eco-friendly choice and feel soft underfoot. Walkways need less support than driveways but must resist weather and wear. You can keep your walkway looking new with simple cleaning and resealing.
Walkways need a compacted sub-base for strength.
Expansion joints help pavers move with temperature changes.
Patterns and symmetry add beauty to your path.
Maintenance is easy with regular cleaning and joint re-sanding.
Patios
Patio pavers turn your backyard into a place for fun and relaxation. You can create a cozy spot for family dinners or a big area for parties. Patios use many types of pavers, such as concrete, brick, natural stone, and porcelain. In 2024, you see new shapes like hexagons and diamonds, large pavers for modern patios, and mixed materials for texture. Many homeowners love warm, earthy colors and patterns like herringbone or chevron. You can add features like fire pits, outdoor kitchens, or lighting for a special touch. Patio pavers give you a safe, slip-resistant surface that looks great and lasts for years.
Try large format patio pavers for a sleek look.
Mix materials for texture and contrast.
Add lighting or fire features for extra style.
Use curved designs for a natural feel.
You have many choices when it comes to types of paver installations. Each type brings its own charm and function to your outdoor space. With the right pavers, you can create a driveway, walkway, or patio that inspires you every day.
Successful Paver Installation Steps
Transforming your outdoor space starts with a strong plan and careful work. You can use this for every paver installation project you have in mind like garden path pavers, outdoor kitchen pavers, fire pit area pavers, cozy patio, pool deck pavers, courtyard pavers, stylish driveway etc. When you follow each step of the paver installation process, you will a create a patio, walkway, or driveway that lasts for years. Let’s walk through each stage so you can see how to install patio pavers with confidence.
Excavation & Grading
You begin by marking the area for your new patio or driveway. Measure the thickness of your paver, then add about 1 inch for bedding sand and 4-6 inches for the base if you are building a patio or walkway. For a driveway, you need a base of 6-12 inches. This total depth gives your paver installation a solid foundation.
Use a shovel or mini-excavator to dig down to the right depth. Remove all grass, roots, and loose soil. The ground must be firm and even. Grading is key. Slope the area away from your house, aiming for a drop of 1/8″ to 1/4″ per foot. This slope keeps water from pooling and protects your paver stones.
Application Type
Recommended Minimum Base Depth
Notes on Adjustments and Conditions
Walkways, Patios, Pedestrian
4 inches (100 mm)
Suitable for pedestrian loads under ideal soil and climate conditions
Residential Driveways
6 inches (150 mm)
Increased depth for vehicles; adjust for soil, drainage, freeze/thaw
Parking Lot/Residential Street
8 inches (200 mm)
Heavier load areas need thicker base
Tools for Accurate Measurement:
Laser Level or Transit Level: Essential for setting and maintaining consistent slope and elevation across the site. This ensures an accurate drop of 1/8″ to 1/4″ per foot, as recommended for effective drainage.
Measuring Tape or Wheel: Use for marking out dimensions and verifying distances across the work area.
String and Stakes: Create a grid or guide lines across the site to ensure straight and even excavation.
Grading for Optimal Drainage:
Slope Calculation: Use the laser level to establish a uniform slope. Typically, a slope of 1/8″ to 1/4″ per foot away from structures like your house is necessary to prevent water pooling.
Elevation Marking: Mark elevations with stakes and string for clear visual guidance during excavation.
Tip: Compact the soil with a plate compactor after excavation. This step prevents settling and keeps your paver installation strong.
Base Preparation
Now you add paver base material. Crushed gravel or crushed quarry rock works best. Avoid stone dust because it traps water and weakens your foundation. Spread the base in layers, each about 2-3 inches thick. Compact each layer before adding the next. For patios and walkways, use at least 4 inches of base. For a driveway, use 6-12 inches.
Use geotextile fabric between the soil and base to stop weeds and keep layers separate.
Open-graded bases help water drain away, which is great for flood-prone areas.
Synthetic base panels are easy to install and resist cracking.
A solid foundation is the secret to a long-lasting paver installation. Take your time with this step.
Stone dust is often avoided in paver installations due to its water retention properties. Unlike more porous materials, stone dust tends to trap moisture, which can compromise the integrity of the paver base over time, leading to shifting and cracking. According to the Interlocking Concrete Pavement Institute (ICPI), materials that retain water can weaken the foundation by creating a mud-like consistency when saturated. This is detrimental in freeze-thaw climates where the trapped water can freeze and expand, causing the base to heave and disrupt the paver alignment.
Synthetic base panels offer several benefits over traditional base methods. They are lightweight, easy to handle, and quick to install, reducing labor time and costs. These panels provide excellent load transfer and distribute pressure evenly across the ground, thus increasing the stability of the surface. Furthermore, synthetic panels are designed to allow optimal drainage, reducing water retention issues associated with freeze-thaw cycles. The American Society for Testing and Materials (ASTM) provides guidelines (e.g., ASTM D799) that validate the use of such panels under specific conditions, highlighting their efficiency and reliability.
Sand Bedding
After you finish the base, add and level the paver sand. Use concrete sand, not mason sand or stone dust. Spread a layer 1 to 1.5 inches thick. Screed the sand with a straight board to make it even. Do not use sand to fill low spots in the base. The sand must be smooth and level to support your paver stones.
Note: The right sand bedding keeps your patio pavers stable and helps water drain away.
Install Patio Pavers
Now comes the exciting part—laying the pavers! Start at one corner and work your way out. Place the paver stones gently on the sand, following your chosen pattern. Keep the joints tight and straight. Use spacers if you want perfect gaps. For patios, walkways, or driveways, always check your lines as you go.
Laying the pavers takes patience and care. You build your dream patio one stone at a time. This step brings your vision to life.
Cutting & Spacing
You will need to cut some pavers to fit edges or curves. Use a diamond-blade saw for clean, precise cuts. For quick, straight cuts, a paver splitter works well. Always measure and mark before cutting. Wear safety gear like goggles and gloves.
Lay all full pavers first, then measure gaps for cuts.
Keep joint spacing even for a neat look.
After cutting, check that each paver fits snugly.
Laser-guided saws and plate compactors help you achieve a professional finish.
Edge Restraints
Paver edging keeps your patio or driveway in shape. It stops the pavers from spreading or shifting. You can choose plastic, metal, or concrete edge restraints. Plastic is easy to install for light use. Metal is strong and lasts a long time. Concrete gives the most support for heavy traffic.
Secure edge restraints with spikes or stakes every 12 inches.
Make sure the edging sits level with the pavers to avoid tripping.
Inspect paver edging often to keep your installation looking sharp.
Paver edging is a must for every paver installation. It protects your hard work and keeps your patio looking great.
Joint Sand & Compaction
Once you finish the patio, sweep polymeric sand into the joints. Fill each gap until the sand sits about 1/8 inch below the top. This locks the pavers in place and stops weeds from growing. Use a plate compactor with a rubber pad to settle the pavers into the sand. Make two or three passes over the surface.
Add more sand if needed after compacting.
Compact in a zigzag pattern for even results.
The right amount of joint sand keeps your paver installation stable.
A well-compacted surface means your patio or driveway will last for years.
Drainage Considerations
Good drainage is the final key to a successful paver installation. Always slope your patio or driveway away from buildings. Use open-graded base materials if you live in a flood-prone area. Install edge restraints to keep water flowing in the right direction.
Clean your pavers often to prevent debris from blocking drainage.
Refill joints and reseal as needed to keep water moving.
Fix any low spots or settling right away to avoid bigger problems.
With the right drainage, your paver stones stay beautiful and safe, no matter the weather.
You can create a stunning outdoor space when you follow these steps. Each part of the paver installation process builds on the last. With care and attention, you will enjoy your patio, walkway, or driveway for many years.
Care & Maintenance
Settling & Inspection
Your new paver patio or driveway needs time to settle. For the first few days, avoid heavy loads or lots of foot traffic. This helps the base and joint sand stabilize. You want to see a level surface, tight joints, and edges that stay in place. Here are signs your paver installation went well:
The surface feels stable and flat.
Pavers line up evenly with no big gaps.
Edges stay firm with no movement.
Joints are filled with sand and lock each paver in place.
If you notice puddles, low spots, or shifting, these are warning signs. Poor settling can lead to uneven pavers or loose borders. Regular inspection helps you catch small issues before they become big problems.
Cleaning & Sealing
Keeping your pavers clean and sealed protects them from Florida’s sun and rain. Start by sweeping away leaves and dirt every week. For deep cleaning, use a pressure washer on a low setting. Remove stains with a paver cleaner and a stiff brush. Let your pavers dry for at least 24 hours before sealing.
Choose a sealer that fits your needs. Water-based sealers give a natural look and let moisture escape. Solvent-based sealers add shine and strong protection. Apply the sealer in thin layers with a roller or sprayer. Wait at least two hours between coats. Keep off the patio for 24 hours after sealing. Reseal every 2–3 years to keep your pavers looking fresh and safe from stains.
Tip: Always fill joints with sand before sealing to stop weeds and keep pavers stable.
Routine Upkeep
Routine care keeps your paver patio or walkway beautiful for years. Sweep weekly to stop stains and weed growth. Rinse with water every month. For easy maintenance deep clean twice a year to remove tough dirt. Inspect joints and edges monthly. Look for loose or cracked pavers and fix them right away.
Maintenance Task
DIY Frequency
Professional Frequency
Why It Matters
Surface Cleaning
Weekly
Monthly
Stops stains and buildup
Deep Cleaning
Twice yearly
Annually
Removes deep dirt and stains
Joint Inspection
Monthly
Quarterly
Finds loose or uneven pavers
Resealing
3–5 years
2–4 years
Protects against weather damage
Tips: In Florida, watch for weeds, moss, and fading from the sun. Use UV-resistant sealers and sweep away leaves often.
When to Call Craft Pavers
Sometimes you need expert help to keep your pavers safe and beautiful. Call Craft Pavers if you see:
Cracks, chips, or surface erosion.
Uneven or sunken pavers.
Discoloration, stains, or white residue.
Loose or wobbly pavers.
Safety hazards like tripping spots.
These problems can get worse if you wait. Craft Pavers offers repairs, sealing, and advice to protect your patio or driveway. You get peace of mind and a space you love.
You deserve a patio that lasts. With the right care and support from Craft Pavers, your paver installation will inspire you every day.
You can change your home by adding a new patio or driveway. Follow each step in the paver installation process. Each part is important, from planning to taking care of your pavers. Picking Craft Pavers gives you great results and peace of mind:
You get a strong base, tight joints, and nice designs.
Experts save you time, help you avoid mistakes, and give design tips.
You get better drainage, warranties, and top-quality pavers.
Customers like Craft Pavers because they are reliable and pay attention to details. People say their patios look amazing. Many talk about their quick, careful work and tell others to use them for paver projects.
A new paver patio can raise your home’s value. It also gives you a place to enjoy for many years. Contact Craft Pavers today and begin making your outdoor space beautiful.
FAQ
How long does paver installation take?
You can expect most paver projects to finish in 3 to 14 days. The size and design of your space affect the timeline. Craft Pavers works quickly and keeps you updated every step of the way.
Can I install pavers myself?
You can try, but professional installation gives you better results. Experts use the right tools and methods. You save time and avoid costly mistakes. Your patio or driveway will look amazing and last longer.
How do I keep my pavers looking new?
Sweep your pavers every week. Rinse them with water each month. Reseal every few years. Quick cleaning stops stains and weeds. You protect your investment and enjoy a beautiful space for years.
What should I do if my pavers shift or sink?
Call Craft Pavers right away. You get fast repairs and expert advice. Fixing problems early keeps your patio safe and strong. You can relax and enjoy your outdoor space again.
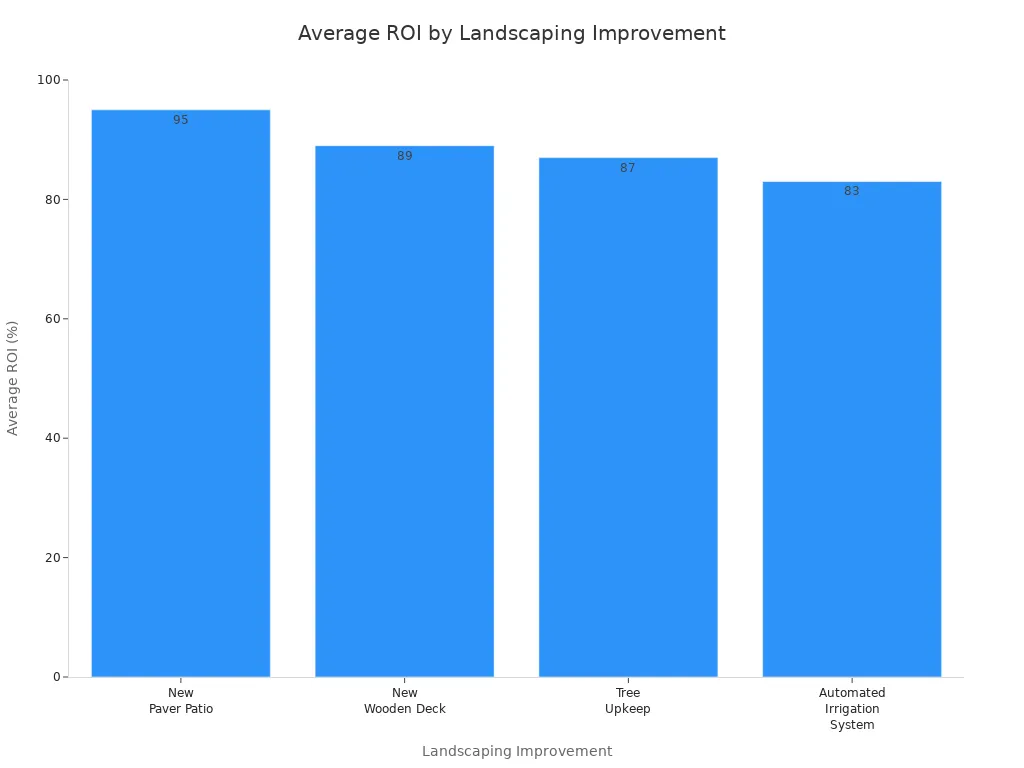
Are pavers a good investment for my home?
Absolutely! If you want to transform your exterior spaces, pavers boost your home’s value and curb appeal. You create a space for fun, family, and memories. Many homeowners see a great return on investment and enjoy their patios for years.
The Most Affordable Paver Sealing Prices in Florida
100% Satisfaction Guarantee on Every Job | Free Estimates
With extensive industry experience, we specialize in paver installation, cleaning, sealing and restoration to create stunning, durable patios and driveways. Trust our expert to rejuvenate your pavers using eco-friendly products, ensuring beauty that lasts.
Dear Florida Homeowner: Unlock your free, personalized price quote today and discover the best rates for your project needs in Florida!
Since 2019, hundreds of homeowners, like you, have trusted us to restore and rejuvenate their pavers. Join the 360+ satisfied clients who have experienced the difference our expertise brings. Once again, you can rely on us to make your outdoor spaces look stunning and inviting.
Boca Raton
Broward County
Palm Beach County
Boca Del Mar
Delray Beach
Deerfield Beach
Fort Lauderdale
Hillsboro Pines
Jupiter
Lake Worth Beach
Pompano Beach Highlands
Wellington
Coconut Creek
Pompano Beach
Boynton Beach
Hillsboro Ranches
Margate
Parkland
Palm Beach
West Palm Beach
Don’t wait any longer to give your pavers the care they deserve. Our expert team is ready to restore your outdoor areas to their full glory. Whether it’s a patio, walkway, or driveway, let us enhance the beauty and durability of your pavers. Contact us now for a free consultation and let’s begin your journey to a more beautiful home exterior.